• Rss
  • LinkedIn
  • Twitter
  • Youtube
  • Xing
  • English English English en
  • Deutsch Deutsch German de
Sales: +49 5251 304-800 | Support: +49 5251 304-636
NoSpamProxy
  • HOME
  • PRODUCT
    • NoSpamProxy Cloud
    • NoSpamProxy Protection
    • NoSpamProxy Encryption
    • NoSpamProxy Large Files
    • NoSpamProxy Disclaimer
    • Testimonials
  • SUPPORT
    • Knowledge Base
    • Forum
    • Training courses
    • Support Request
    • Software-Download
    • Resources
  • PARTNERS
    • Finding Resellers
    • Becoming Reseller
    • Partner Portal
  • COMPANY
    • Team
    • Career
    • Contact
  • EVENTS
    • Events
    • Webcast Training
  • BLOG
  • FREE TRIAL VERSION
    • Price request
    • Free trial version
  • English
    • Deutsch
  • Search
  • Menu Menu
info icon

Attachment detection by Cyren Premium AntiVirus

How-tos 10.x, 11.x, 12.x, 13.x, 9.2

The Cyren Premium AntiVirus scanner is part of the Malware Scanner action and can be used if NoSpamProxy Protection is licensed. Cyren Premium AntiVirus checks attachments that are attached to an email. In doing so, it carries out two basic checks:

  • Local checks against definitions
    • The definitions are regularly downloaded from the Cyren servers. In case of access problems to the Cyren servers, the definitions must not be older than two days.
    • During the check, the attachment is placed in the directory C:\ProgramData\Net at Work Mail Gateway\Cyren\Temp, checked and deleted again.
  • Live checks – Zero Hour Protection
    • Check for conspicuous attachments in the recent past. A hash value is generated and sent to Cyren, which then sends a response with the corresponding classification by Cyren.

Unlike with the Cyren AntiSpam filter, the NoSpamProxy support has no way of influencing this behaviour in the case of a misclassification.
In the case of misclassifications – i.e. false positives or false negatives – the sender or the recipient of the email must always contact Cyren and have this corrected accordingly.

A description of the process can be found on the respective Cyren support page.

In case of local problems or missing definitions, please refer to the Knowledge Base article Cyren Engines – Troubleshooting

Note

To ensure parallel operation with other locally installed virus scanners on the gateway role, please refer to the Knowledge Base article How to configure on-access virus scanners and define the exceptions as described!

Further information

  • For information on the detection by the Cyren AntiSpam Filter, please refer to the Knowledge Base article Recognition of emails by the Cyren AntiSpam filter.
  • For information about detection by the Cyren IP Reputations filter, see Knowledge Base article Detection of IP addresses by the Cyren IP Reputation filter
  • For information on detection by the Cyren URL classification service, see the Knowledge Base article How to influence URL classifications.
  • Troubleshooting information for all Cyren services can be found in the Knowledge Base article Cyren Engines – Troubleshooting.

20.04.2021/by Technik NoSpamProxy
info icon

How to use different designs based on the sender domain

How-tos 11.x, 12.x, 13.x

This article describes how you can customize the templates for the design of the system emails of NoSpamProxy (including the PDF mails) starting with NoSpamProxy 11.x so that different designs are used based on the sender domain. NoSpamProxy uses the template engine for .NET “Razor” as basis for the dynamic change.

The CSHTML files to be edited are located in the directory %Program Files%\Net at Work Mail Gateway\Intranet Role\Templates. After the change, the files are automatically replicated to all connected gateway roles.

IMPORTANT
You need at least rudimentary HTML knowledge in order to make the adjustments.

Adaptation of the template files

You are welcome to request prefabricated sample files with different designs from NoSpamProxy Support. This file can only be used as of NoSpamProxy 11.0. In this example two different designs are used for the sender domains netatwork.de and nospamproxy.de. You can extend or reduce the number of domains at any time.

After downloading, unpack the ZIP file into a temporary folder. It contains the following files:

  • CommonMailTemplate.cshtml
  • CommonMailTemplateNaw.cshtml
  • CommonMailTemplateNsp.cshtml
  • ConvertMailContentToPdfAttachmentActionPdfHeader.cshtml
  • ConvertMailContentToPdfAttachmentActionTeaser.cshtml
  • EncryptedMailNotificationTemplate.cshtml

Start with the files that begin with “CommonMailTemplate”. Here you determine the appearance of all emails that are required for the PDF Mail. Make sure that you store the standard design in the CommonMailTemplate.cshtml. Customize the style sheets in the respective files according to your needs. The corresponding logos will also be included in these files. In later live operation, the logo files with the correct name must also be available in the Templates folder.

Then adjust the file “ConvertMailContentToPdfAttachmentActionPdfHeader.cshtml”. This file determines the layout of the PDF file as such. In contrast to the CommonMail template files, you only need one file here to define the exceptions. The adjustments take place in the upper part. An example for three different designs is included. What is important is that you specify the design for the different domains. If NoSpamProxy does not find the corresponding sender domain during live operation, it uses the default design, which you can define with the template editor in the admin GUI.

When all files are adjusted, copy all CSHTML files into the Templates folder of your program version. Make a backup of all contained files beforehand!
Please note that the files will be overwritten when patching or upgrading. After a version upgrade, please do not copy the older, modified files over the newer ones, but modify them again. Otherwise there is a risk that new, necessary information will be missing in the template files.

Overview of available template files

The following list provides an overview of the function of the individual files:

ApplySymmetricEncryptionPasswordNotice.cshtml

If a user sends an email as PDF Mail, he will receive a notification of the password used, or information that the password was sent to the recipient by SMS or that the creation of the PDF Mail failed. The text of the respective notification is in this file. The appearance regarding colors and logo is defined via the CommonMailTemplate.

AttachmentManager.cshtml

If a file is removed from an email using the content filter rules, the recipient receives information about it. The attachment can either be removed and deleted, it can be uploaded to the Web Portal, and it can be uploaded to the Web Portal and assigned an admin share. A separate text is available for each of the three actions, which can be edited in this file. The appearance regarding colors and logo is defined via the CommonMailTemplate.

AttachmentManagerNotificationForBlockedAttachmentsModel.cshtml

If emails with certain file attachments are rejected via the content filter rules, the sender receives information about the rejection. The content of this message can be defined in this file. The appearance regarding colors and logo is defined via the CommonMailTemplate.

AttachmentQuarantine.cshtml

If a file is moved to the Web Portal using the content filter rules and assigned an admin share, the administrator receives an info mail about it. The content of this email is defined in this file. The appearance with regard to colors and logo is determined via the CommonMail template.

AttachmentQuarantineApproval.cshtml

If a file is moved to the Web Portal using the content filter rules, assigned an admin release, and then released by the administrator, the actual recipient of the file receives information about the release. The content of this email is defined in this file. The appearance with regard to colors and logo is determined by the CommonMail template.

CommonMailTemplate.cshtml

This file defines the general appearance of notifications. Here, for example, the colors and the logos to be used are stored as HTML tags. All other files except the “ConvertMailContentToPdfAttachmentActionPdfHeader.cshtml” contain only the text modules.

ConvertMailContentToPdfAttachmentActionPdfHeader.cshtml

The appearance of the PDF file is defined in this file. Colors and logos must be defined here again.

ConvertMailContentToPdfAttachmentActionTeaser.cshtml

This file contains the text for the carrier email of the PDF file. The recipient of a PDF Mail is informed that the actual content of the email is in the attached PDF document. The appearance is defined via the CommonMailTemplate.

ConvertOfficeDocumentToPdfPreface.cshtml

With the “ConvertOfficeDocumentToPDF” action, it is possible to convert Office documents to PDF to provide the recipient with a preview without active content. Information is placed in front of the generated PDF document. The content of this information is defined with this file.

DeliveryNotificationReport.cshtml

This is the content of the send report if a user has requested it in Outlook. The appearance is defined via the CommonMailTemplate.

DeMailConnectorIssueEscalationMail.cshtml

If NoSpamProxy cannot retrieve or send De-Mail repeatedly, an administrator will be notified. The content of this message can be defined here.

EncryptedMailNotificationTemplate.cshtml

If a user marks an email as “Automatically encrypt” and enQsig does not have a cryptographic key, the recipient will be informed. This info mail states which options he has. The content of this email is recorded in this template. The appearance is defined via the CommonMailTemplate.

EncryptionDelayedNotificationForSender.cshtml

If a user marks an email as “Automatically encrypt” and enQsig does not have a cryptographic key, the sender is informed about the delay. The content of the delay message is defined here. The appearance is defined via the CommonMailTemplate.

EncryptionFailureNotificationForSender.cshtml

If a user marks an email as “Automatically encrypt” and an encryption error occurs, the sender is informed. The content of this message can be found here. The appearance is defined via the CommonMailTemplate.

EncryptionSucceededNotificationForSender.cshtml

If a user marks an email as “Automatically encrypt”, he will receive a notification as soon as the email has been encrypted. The appearance is defined via the CommonMailTemplate.

​LargeFileDownloadNotification.cshtml

If the recipient of a file that was previously moved to the Web Portal downloads it, the sender is notified. The content of this information is determined by this file.

MailOnHoldExpired.cshtml

If a user marks an email as “Automatically encrypt” and enQsig has no cryptographic key and the recipient of the email does not deposit a cryptographic key within 5 days, the email will be discarded and the sender informed. The content of this message can be found here. The appearance is defined via the CommonMailTemplate.

MailValidationError.cshtml

If a De-Mail cannot be sent via the De-Mail connector, the sender is notified. The content of this message can be found here. The appearance is defined via the CommonMailTemplate.

PolicyFailureNonDeliveryMessage.cshtml

The sender will be notified if an email violates the policy in the rules. The content of this message can be found here. The appearance is defined via the CommonMailTemplate.

QualifiedSignatureIssueEscalationMail.cshtml

If the verification or creation of a qualified signature fails, a notification is sent to a specified address. The content of this message can be found here. The appearance is defined via the CommonMailTemplate.

SampleAutoReply.cshtml

With the action “AutoReply” it is possible to answer e-mails with an automatically generated email. The content of this reply is defined here.

SymmetricPasswordUpdateNotification.cshtml

If an external recipient has stored a password for the PDF mail on the WebPortal, he will be notified of the change. The content of this message can be found here. The appearance is defined via the CommonMailTemplate.

WordFilterMatchNotification.cshtml

The word filter provides the ability to notify any email address when certain words are found in emails. The content of this notification can be defined here.

20.02.2019/by Stefan Feist
info icon

Setting user permissions for NoSpamProxy databases

How-tos 11.x, 12.x

It is common that not only the user who originally performed the installation needs to perform updates, but also other administrator accounts. To do this, it is necessary to set up the appropriate permissions for these additional users. The corresponding steps are described below:

  1. Notes
      • All steps apply to all roles of NoSpamProxy; they differ only in the database names.
        • Database Intranet Role: NoSpamProxyAddressSynchronization
        • Database Gateway Role: NoSpamProxyDB
        • Database Web Portal: enQsigPortal
      • Users and user groups (local or in the domain) can be registered.
    • Log on with the user with which the installation was performed.
  2. Install the SQL Management Studio.
  3. Open SQL Management Studio and log on to the local instance  that contains the NoSpamProxy database(s), using Windows authentication.
  4. Expand the Security folder and the Logins folder.
  5. Right-click on the “Logins” folder and select “New Login” from the context menu.
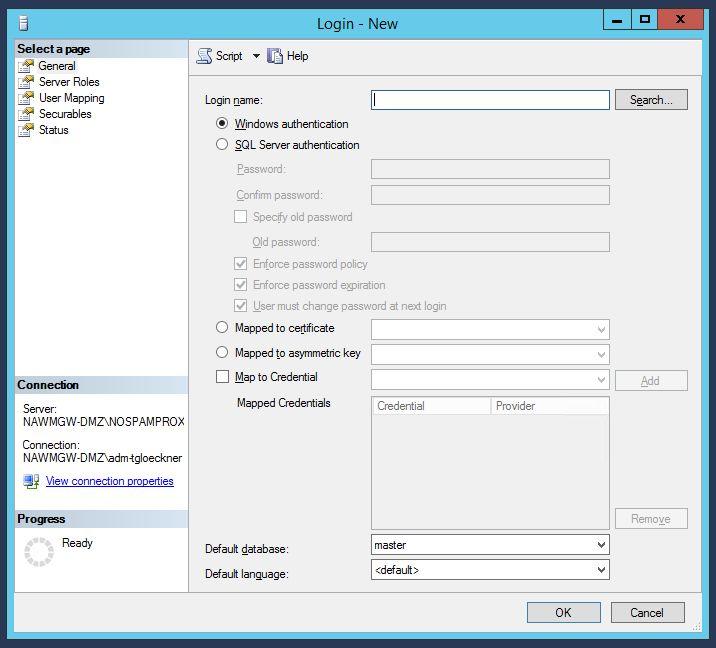
  6. Under “General”, select the user to be added, but keep the “Windows Authentication” item.
    Database Rights - General
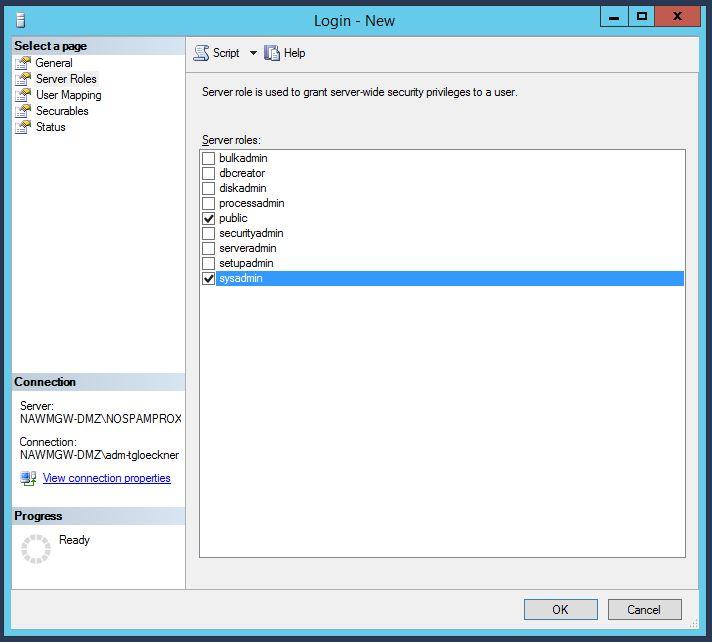
  7. Under “Server Roles” tick the checkbox for “sysadmin”.
    Database Rights - Server Roles
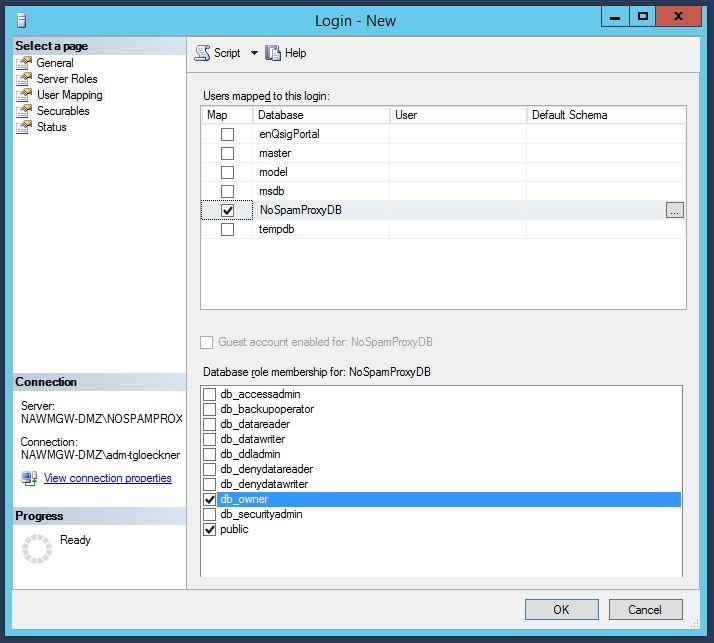
  8. Under “User Mapping”, check the corresponding database and additionally activate the role “db_owner”.
    Database Rights - User Mapping
  9. All other settings are optional.
  10. Save the new login and close SQL Management Studio.

To verify access, log on to the system with the added user, open SQL Management Studio, and check whether you can view the database tables. If this works, access is set up.

06.02.2019/by Stefan Feist
info icon

How to integrate SwissSign as a certificate provider

How-tos 10.x, 10.x, 11.x, 11.x, 12.x, 13.x, 9.2

Important information on integrating SwissSign as a certificate provider

The following document was created in collaboration with SwissSign. It contains all relevant information on the integration of a Managed PKI from SwissSign into NoSpamProxy.

FAQNetAtWork.pdf

This document will be updated if necessary.

Last updated 03.09.2015.

SwissSign Silver ID products supported by NoSpamProxy

NoSpamProxy currently supports two out of three Silver ID products offered:

  • Silver certificates without state, organisation and country field
    • Name in the order process: Email ID Silver, email address validated (web interface or partner application)
    • Product name in NoSpamProxy: <<company name>>-perso-silver-emailonly
    • As of NoSpamProxy Version: 13.2.21230.1449
      Error Message before this version: Unconsumed SDN (i.e.: SDN attributes not needed and not utilized; please remove them and resubmit your request): o=[…]
  • Silver certificates without state field
    • Name in the order process: Email ID Silver, email address validated, organization, country (partner application only)
    • Product name in NoSpamProxy: <<company name>>-perso-silver
    • As of NoSpamProxy Version: 13.2.21111.1701
      Error Message before this version: Unconsumed SDN (i.e.: SDN attributes not needed and not utilized; please remove them and resubmit your request): state=[…]

Products not supported

The following Silver ID product is not supported:

  • Silver certificates with state field
    • Name in the order process: Email ID Silver, email address validated, organization, canton/state, country (partner application only)

Please take note of this information when ordering and make sure to only order the supported products!

If you have ordered the wrong product, you will find the form with which you can request the change from SwissSign under the following link:
https://www.swisssign.com/dam/jcr:85abf68a-1990-47f7-9530-9b1cce0397a7/MPKI_ChangeOrder_DE.pdf

Information in connection with SwissSign Gold products

If certificates for general or system mailboxes are to be requested, a Pseudo: must be placed in front of the common name (CN). This can not be set automatically by the NoSpamProxy in front of it, so that this information must come from the Active Directory or LDAP. This information must be placed at first position, so ideally it should be delivered as first name.

In order to send the correct order in the CN, please use the NoSpamProxy version 13.2.21111.1701 or higher.

06.12.2018/by Stefan Feist

SEARCH

PRODUCT

  • All Topics
  • NoSpamProxy Cloud
  • NoSpamProxy Protection
  • NoSpamProxy Encryption
  • NospamProxy Large Files

Knowledge Base

Knowledge Base

Note: The information in this knowledge base is only relevant for NoSpamProxy up to version 13.2. All information for NoSpamProxy 14 and higher can be found in the online documentation.

CATEGORY

  • All Topics
  • News
  • Product
  • Tech & Support
  • Events
Followon TwitterSubscribeto RSS Feed

NoSpamProxy

  • NoSpamProxy Cloud
  • NoSpamProxy Encryption
  • NoSpamProxy Large Files
  • NoSpamProxy Disclaimer
  • Price request
  • Team
  • Career
  • General terms and conditions
  • Data Protection Information for Business Partners and Applicants
  • Cybersecurity (PSIRT)

Partners

  • Becoming a reseller
  • Partners
  • Order Certificates
  • Newsletter

Categories

  • All topics
  • News
  • Support
  • Updates
  • Order certificates

Latest News

  • NoSpamProxy 14 unterstützt als erstes Mail-Gateway SMIME 4 PreviewUpgrade consultation hours version 14.030.06.2022 - 13:50
  • E-Mail-Sicherheit in Unternehmen Status Defizite Strategien PreviewFocus Point study by analyst firm techconsult on the state of email security in German companies30.06.2022 - 11:28
  • NoSpamProxy 14 unterstützt als erstes Mail-Gateway SMIME 4 PreviewNoSpamProxy 14 is the first mail gateway to support S/MIME 427.06.2022 - 11:46
IMPRINT  • EULA • Privacy Policy • © 2022 Net at Work GmbH
  • Rss
  • LinkedIn
  • Twitter
  • Youtube
  • Xing
Scroll to top